The Definitive Guide to Control Joints Concrete, Expansion Joints, and Long-Lasting Flatwork
Concrete is extraordinary: it flows, it cures, and it becomes a stone-like structure that supports our buildings, sidewalks, and driveways. Yet the same properties that make concrete strong also make it prone to cracking. This guide explains how control joints and expansion joints work together to manage movement so your slab performs as intended for decades—on interior concrete floors, exterior concrete sidewalks, patios, loading bays, and more.
Why Concrete Cracks—and How Joints Manage Movement
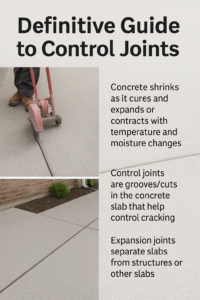
Concrete shrinks as the chemical reaction of hydration proceeds. It’s also sensitive to temperature and moisture swings. Those changes generate tensile stress inside a slab. When stress exceeds capacity, cracking appears. The practical answer is to create planned lines of weakness—control joints—and to separate elements that must move independently—expansion joints.
Control Joints vs. Expansion Joints: Plain-English Definitions
Control joints are intentionally cut or tooled grooves in concrete that encourage cracking to occur in a straight line, hidden inside the joint. Expansion joints are full-depth separations—often with compressible filler—that isolate a slab from walls, concrete foundations, columns, or other placements so each can move without pounding its neighbor. On most projects you’ll use both types of joints to handle different kinds of movement.
Where Each Joint Type Belongs
Use control joints to subdivide broad concrete surfaces into smaller panels so normal shrinkage forms tight, controlled cracking instead of random fissures. Use expansion joints anywhere the slab abuts concrete walls, foundations, steps, or where two placements meet that will expand and contract at different rates. In cold regions, you also place joints to absorb freeze–thaw movement in exterior flatwork.
Rule-of-Thumb Spacing, Depth, and Layout
A practical rule of thumb for control joints is to space joints at 2 to 2.5 times the slab thickness (inches → feet), and to cut depth to at least one-quarter of the slab. Keep panels nearly square; long sides should be no more than ~1.25× the short side. Avoid re-entrant corners by running joints through openings and around columns. Use expansion joints at fixed restraints and around the perimeter to isolate the slab from surrounding building materials.
Timing Matters: When to Saw or Tool Joints
Cut as soon as the surface supports the saw without raveling. For early-entry saws that can be within one to four hours; for conventional saws, four to twelve hours is common. Hot, windy, or arid temperature conditions may push you earlier; cold, damp weather may delay cutting joints. Always test a small area first and adjust to environmental conditions and the behavior of the material on your job site.
Special Cases: Fibers, Polished Floors, and Heated Slabs
Fibers help reinforce concrete against micro-crack growth, but they don’t eliminate the need for joints. For polished concrete floors, plan joint locations with the finishing pattern so the saw cuts look intentional. Heated slabs expand more than unheated areas, so add or widen expansion joints where warm and cool zones meet.
Driveways, Sidewalks, Patios, and Interior Slabs
A concrete driveway sees heavy loads and frequent temperature changes, so tighter spacing of control joints improves performance. For concrete sidewalks, keep panels short and carry joints through curb cuts and around fixtures. On patios, align joints with score lines or paver patterns for a clean look. Inside buildings, coordinate control joints and expansion joints with aisles, racking, and column grids so wheels don’t thump on random cracking.
What About Foundations and Walls?
Slabs-on-ground use control joints extensively. Concrete foundations and concrete walls rely more on expansion joints and construction joints, plus rebar or mesh to reinforce concrete, to handle movement. Where a slab meets foundation elements, isolate with expansion joints to reduce stress transfer into the frame and prevent edge cracking.
Materials and Tools You’ll Use
Common building materials for joints include pre-molded expansion joints fillers, backer rod, joint sealants, bond-breaker tape, and edge-forming tools. For sawcuts you’ll use early-entry saws, wet saws, or crack-inducing inserts. Select materials compatible with the environment, exposure to de-icing chemicals, and the finish of the surface.
Moisture, Mix, and “Excess Water”
Mix design and placing practice drive performance. Excess water in the mix makes finishing feel easier but increases shrinkage, inviting more cracking. Excess water during curing can also stain surfaces and leave soft paste at the top. Use a low water–binder ratio, proper curing compound, and wind/sun protection to limit rapid moisture loss—and to deliver high quality concrete.
Subgrade, Base, Drainage, and Frost
A stable base reduces differential settlement. Consider vapor retarders under interior slabs that receive resilient flooring or coatings, and include sand blotter layers when appropriate. Where frost and soil erosion threaten, design drainage so the ground stays stable. Good base prep gives your joints a fair chance to do their work.
Safety and Efficient Workflows
Saws, dust, cords, and cart paths introduce hazards. Plan the process, mark cut lines, and post spotters to protect people and finishes. Better planning improves overall safety and keeps the work efficient, particularly when other trades are sharing the space.
The Seven-Step Process We Use on Every Pour
Pre-construction: review drawings, confirm slab thickness, exposure, and restraints.
Layout: draw a grid that keeps panels near-square; pay special attention to doorways, columns, trenches, and re-entrant corners.
Place joints: mark locations before the pour so crews have a clear map.
Place and finish: keep the surface true, avoid overworking with water, and align tooled grooves with saw cuts.
Cutting joints: begin at the earliest safe time, starting with the longest runs.
Inspect: check depth (≥ 1/4 slab), continuity of expansion joints, and that corners are intercepted to minimize cracking.
Seal: after curing/drying, seal where specified to keep grit and water out—and to protect against temperature and moisture swings.
Answers to the Questions We Hear Most
How often do you need control joints in concrete?
Use the spacing rule above, then tighten it when panels are long, narrow, or exposed to sun and wind. Interior warehouse bays can often run wider; exterior flatwork often benefits from closer joints to manage movement.
What is the rule of thumb for concrete control joints?
Plan spacing at 2 to 2.5× slab thickness (inches → feet) and cut at least one-quarter depth. Keep panels roughly square and run joints through openings.
How big can a concrete slab be without control joints?
For most concrete slabs on ground, avoid panels larger than ~15 ft on a side unless you have engineered detailing, significant reinforcement, and predictable site conditions.
Why would you cut control joints in a concrete slab?
To guide inevitable cracking into discreet, straight grooves so the surface stays attractive and serviceable. Without them, random cracking can telegraph through coatings and finishes.
How to control cracking in concrete?
Start with proper subgrade, mix design, curing, and prompt control joints. Reinforcement, fibers, isolation, and well-placed expansion joints all contribute to control cracking and durable concrete.
What is the best solution for cracks in concrete?
If a concrete crack is tight and dormant, routing and sealing may suffice. If it’s moving or wide, consider structural repair, doweling, or partial-depth replacement. Always address the cause—movement, load, or moisture—so repairs last.
Can you put a skim coat of concrete over old concrete?
Yes. Surface prep is vital: clean, profile, and bond with compatible building materials. Remember that overlay systems still need a joint strategy that mirrors or relocates underlying joints.
Can you put too many control joints in concrete?
Yes—over-jointing can create slender panels that curl or spall. Balance aesthetics, load paths, and movement. It’s better to have a thoughtful grid than a random assortment of cuts.
How much does it cost to get a 20×20 slab of concrete poured?
Costs vary by region, access, base prep, reinforcement, finish, and sealing. Include excavation, base, vapor retarder, reinforcement, the concrete itself, placing, finishing, joints, and sealing. Ask for an itemized bid so you can compare project scope apples to apples.
What is the 20/30/40 rule in concrete?
It’s a field reminder: protect fresh placements from wind over ~20 km/h, temperature swings over ~30 °C in a day, and direct sun over ~40% of the working period—conditions that accelerate shrinkage and early-age cracking.
What is considered flatwork in concrete?
Flatwork refers to horizontal placements like slabs-on-ground, floors, sidewalks, patios, and driveways—areas where control joints and expansion joints have the biggest visual and functional impact.
How much is a 1,000 sq ft concrete slab?
Similar to the 20×20 example, local pricing and scope drive cost. Ask for itemized estimates that show base prep, reinforcement, joint materials, and sealing so you can select the best value for your concrete.
Why Choose Omega 2000 for Your Joint Plan
We’re concrete contractors who are well versed in the science and craft of jointing. Our expert team coordinates design, layout, and execution so joints align with architecture, traffic, racking, and finishes. We use high quality concrete practices, select compatible building materials, and document the process so owners and GCs can verify compliance across the whole construction.
From Design to Proof—What You Can Expect
We review drawings, verify restraints, and create a joint map before the pour. On the day, we monitor temperature, wind, and mix behavior to decide the earliest safe time to cut. After curing, we return to seal specified expansion joints and to verify edges remain sound under wheels. This keeps concrete looking clean, controls cracking, and supports the building’s long-term performance.
A Note on Reinforcement and Restraint
Bars and mesh reinforce concrete; they limit crack widths but don’t stop movement. Use dowels to carry shear across construction joints where needed. Isolate slabs from walls and foundations with expansion joints so restraint doesn’t concentrate stress at edges or penetrations.
Troubleshooting: Curling, Spalling, and Random Cracking
Curling results from moisture and temperature gradients through the depth. Spalling near saw cuts can come from late cutting or insufficient depth. Random cracking often traces back to restraints, missed joints at re-entrant corners, or too much water in the mix. Each symptom points to specific fixes in layout, timing, or curing—and your Omega 2000 contractor can create a corrective plan.
Sustainability and Long-Term Performance
A slab that cracking randomly is costly to maintain. A placement with a sound joint design stays serviceable longer, which saves material, lowers waste, and supports overall safety. Good jointing is quiet sustainability: it extends life without extra cement or exotic additives.
Ready to Talk About Your Project?
Whether you’re planning new concrete or improving an existing facility, we can tailor the joint strategy to your concrete needs, schedule, and budget. Contact Omega 2000 for a free estimate—we’ll walk the site, review loads, and propose a clear plan for joints, expansion joints, and control joints that fit your building.